
Aug
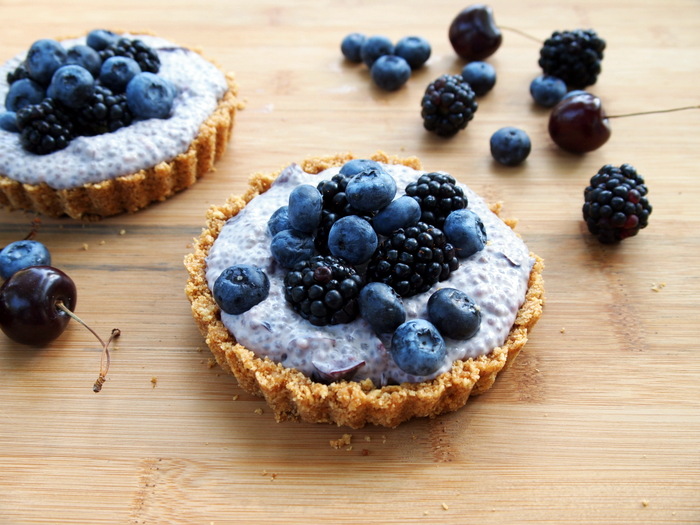
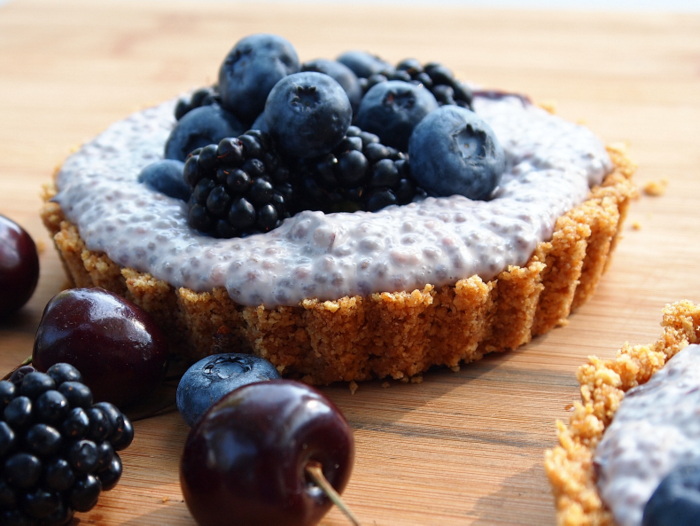
Cherry-Berry Chia Seed Pudding Tarts
If you’re anything like me than you associate chia seeds with those funny terra-cotta animals covered with sprouted greenery called Chia Pets. Come on, I know you remember those. Maybe you even had one. Was it the pig, the bunny rabbit, the garden gnome, or maybe something fun like Bart Simpson or Garfield? And how about the jingle that went with the Chia Pet commercial? Cha..cha..cha..chia! How could you forget. Well, at some point someone discovered that chia seeds are good to eat. Really good to eat in fact. According to nuts.com chia seeds are high in Omega-3s, help reduce blood pressure, and control blood sugar levels, among other things. The really cool thing about chia seeds is that they absorb liquid and create a kind of chia-gel that helps with hydration and makes your body feel fuller faster. It’s this quality that makes chia seeds perfect for pudding. It’s simple- you mix chia seeds with the milk product of your choice- be it almond, coconut, soy, rice, or just plain old cow milk- stir, chill, and before you know it you have a thick, tasty pudding. Pretty amazing if you ask me. We’ve been eating chia seeds sprinkled on our morning yogurt for quite a while now, but this was my first time delving into the world of chia seed pudding. It couldn’t have been easier and I can’t wait to experiment with this recipe and try some different versions.
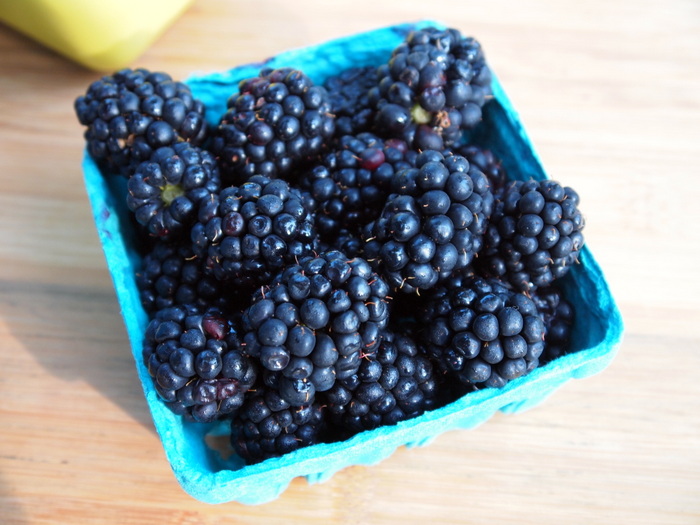
The idea to make chia seeds pudding all started with these huge blackberries that I picked up at the farmers market last week.
I was going to attempt for the third time to make No Bake Orange Cream Tartlets with Mixed Berries from the Oh Ladycakes Blog. I love the look of these no-bake tarts filled with coconut whipped cream and piled high with fresh berries. The problem is that despite my best efforts, I simply cannot get the coconut milk to whip up properly. About a month ago I tried twice and gave up both times in frustration after whipping for what seemed like a ridiculous amount of time, and ending up with milk no thicker than when I started. I really wanted to make these tarts though,and for about half a second I was tempted to try again. But then I came to my senses. Instead I decided to use the coconut milk and make chia seed pudding as a substitution for the coconut whipped cream. I worked perfectly except that chia seed pudding is not nearly as pretty as coconut whipped cream. The dark seeds give it a funny, bumpy texture. But trust me- it tastes fantastic.

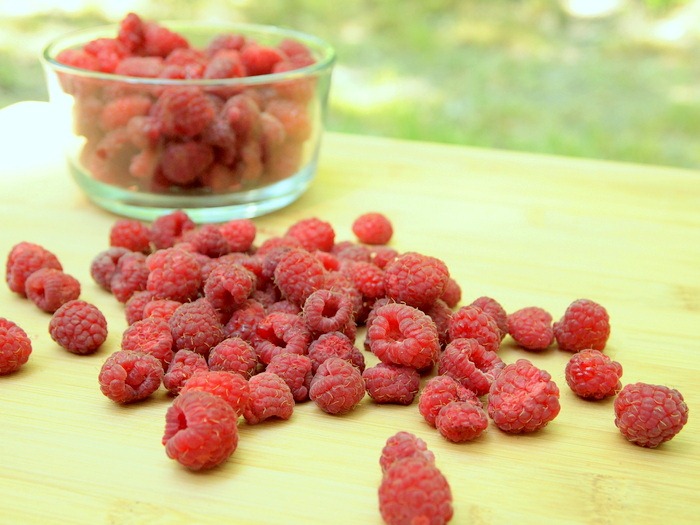
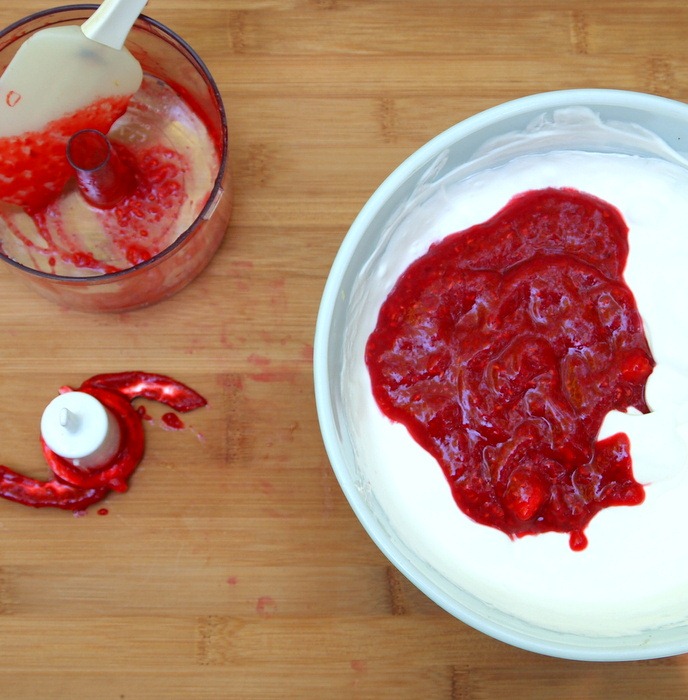
Oh, and those dark red bits in the pudding- those are cherries. How did those get in there you ask? Well it all started with raspberries. You see I wanted to go raspberry picking but when I arrived at the pick-your-own farm it was closed. Boo, how sad for me. Okay, plan two. I would buy some raspberries from the store. So I went to the Good Food Store here in Missoula where I was sure they would have some pints of local raspberries that I could pretend I picked. Except they didn’t. The raspberries were the same Driscoll’s brand grown in California & Mexico that all grocery stores sell in those tiny containers for like a million dollars. Since I already had both blackberries and blueberries from Montana, I really didn’t want to add raspberries from out of state, or out of country, to the mix.

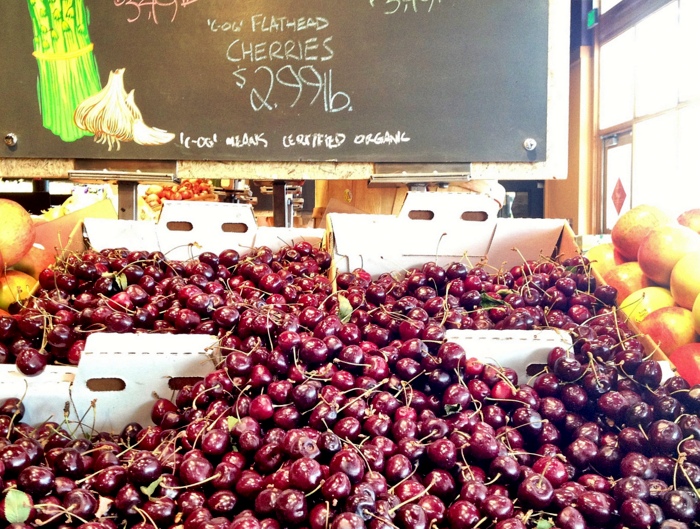
Luckily I found something better. Cherries! Montana apparently grows some really tasty cherries. These come from the area around Flathead Lake which is only an hour north of Missoula. If I can’t have local raspberries, than cherries are an excellent substitution. I decided to put the cherries in the pudding rather than on top. The idea was to incorporate some cherry flavor and color into the pudding. In retrospect I probably should have purred the cherries in the food processor because the chopped cherries didn’t give me the pink color I was looking for.
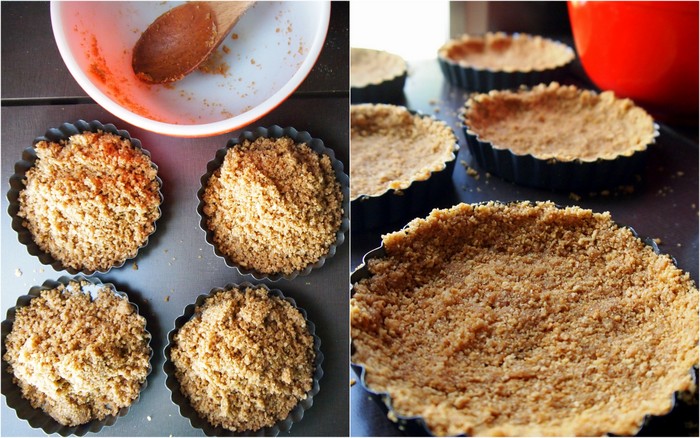
After making the pudding I got to work on some super simple no bake tarts. Crushed graham crackers, butter, sugar, and a dash of cinnamon all mixed up and spooned into tart pans. A quick press with the fingers and into the freezer to stiffen up for an hour.
After the pudding and tarts had chilled for awhile it was only a matter of spooning the pudding into the shells and topping with fresh berries.
I think I’ve confirmed it. Chia seeds are good for pets and pudding.
Cherry-Berry Chia Seed Pudding Tarts
Inspired by No Bake Orange Cream Tartlets with Mixed Berries by Oh, Ladycakes
Makes: 6 4-inch tarts, or 1 9-inch tart
1 can (14 ounces) coconut milk
3 tablespoons maple syrup or honey
1 teaspoon vanilla extract
1/3 cup chia seeds
1/2 cup seeded, chopped or purred cherries
12 graham crackers
2 tablespoons sugar
1/8 teaspoon salt
1 teaspoon cinnamon
10 tablespoons butter, melted (use vegan butter or melted coconut oil as a vegan option)
2 cups fresh berries
1. Make the pudding. In a medium bowl combine the coconut milk through cherries. Mix well so all the chia seeds are submerged in the liquid. Cover and place in fridge for about 1 hour.
2. Make the tarts: Place the graham crackers in a sealable plastic bag and crush with a rolling pin. Place in a bowl and add the sugar, salt and cinnamon. Pour the melted butter over the top and mix well.
3. Press the graham crackers mixture into 6 4-inch tartlet pans, or 1 9-inch tart pan. Place in the fridge to firm up for at least 1 hour, or the freezer for at least 30 minutes.
4. Remove the ingredients from the fridge and spoon the pudding into the tart pans. Top with fresh berries.
Jul
Frozen Raspberry + Peach Pie

I don’t know about where you live, but around here it’s been seriously hot and humid. We’re talking frizzy hair, sweaty body, lethargic brain kind of hot. The kind of hot where you just wanna lay on the grass under a sprinkler all day, eat ice cream till your tongue freezes, or consume half a frozen fruit pie before you remember to take pictures of it. Yeah,that kind of hot.
Maybe the heat’s made me a little wacky, or maybe I was already a little wacky, but for some reason lately I’ve had the urge to bake a pie. A pie with fresh raspberries and juicy peaches.
Bake a pie in this heat? Probably not the best idea. But I still want pie!
It seemed I was destined to lead a pieless existence until the weather cooled off. But wait…I have the perfect solution. A pie baked on the grill! Recently I’ve been obsessed with the idea of baking some kind of dessert on my grill. I think it started when I got this cool griddle accessory for my grill. Other people may think pancakes, potatoes, or sausages when they see a griddle. Not me, I think pie. Not the fancy kind of pie with crimped edges and a pretty lattice crust, but the rustic kind where jagged edges of dough fold up over the fruit and the filling threatens to burst out the sides. I think the proper term is a Crostata. But since I’m not very proper I’ll just call it a rustic pie or tart. Here’s the thing though. It was too hot to even turn on the grill. The thought of standing over the hot grates and attending to my pie/tart was unbearable. So I abandoned that idea too.
Right about now you’re probably wondering why I’m even telling you about this pie on a grill idea since I didn’t actually make it. Umm…well, maybe cause I’m still thinking about it and ideas shared out in the world are much more likely to come to fruition then ones left rattling around in my head. The thing is that I still very much want to make a pie on the grill. But this heat has left me cranky, impatient, and craving something cold & refreshing. So for now a frozen no-bake fresh fruit pie will have to stand in as substitute. A pretty yummy substitute. And crazy easy to make…even on a hot, sweltering day.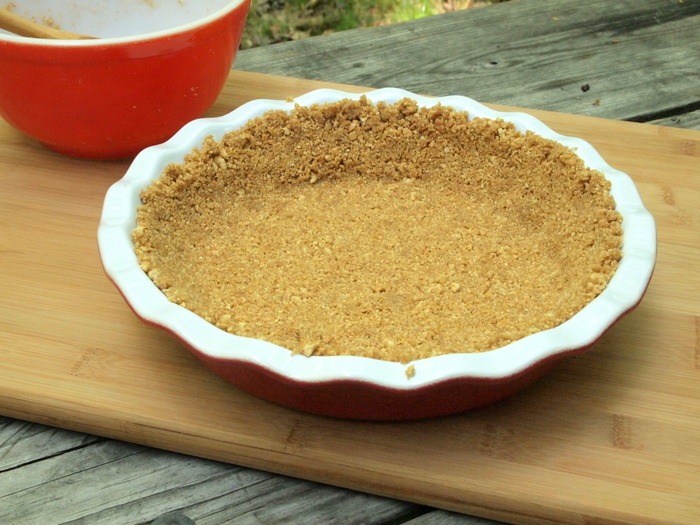
You start with a graham cracker crust. Store bought or homemade, it doesn’t matter. I made my own by combining melted butter with graham crackers, brown sugar and bit of cinnamon. I then patted it into a pie plate and stuck it in the freezer for about 15 minutes. See, I told you- no bake!
Next comes the filling. Cool whip, vanilla yogurt and raspberry-peach puree. Simple, simple, simple.
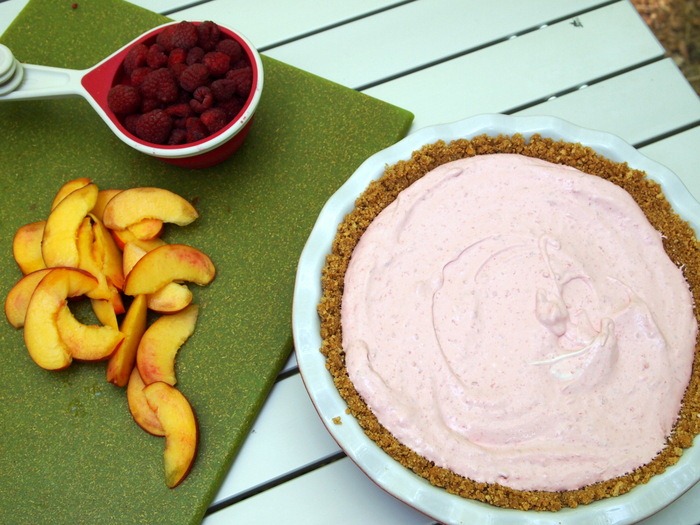
More fresh fruit on top and then in the freezer it goes. Now comes the hard part- waiting for it to freeze. My advice? Have a popsicle while you’re waiting…or two, or three. Or better yet, sneak into your neighbors yard and jump in their pool. Splash around for a few hours and when you come back the pie will be ready. Tell them I said it was alright.

Frozen Raspberry + Peach Pie
Makes one 9” pie
1 1/2 cups graham crackers, crushed
2 tablespoons brown sugar
1 teaspoon cinnamon
6 tablespoon unsalted butter, melted + more for the pie plate
1 8 ounce (3 cups) container low-fat Cool Whip, room temperature
16 ounces low-fat vanilla yogurt
2 cups fresh raspberries, divided
2 peaches, 1 roughly chopped & 1 cut into thin slices
1. Make the crust: Butter an 8-inch pie plate and set aside. Place the graham crackers in a large sealable plastic bag and crush with a rolling pin. In a medium size bowl, combine the crushed graham crackers, brown sugar, cinnamon and melted butter. Stir well and press the mixture into the prepared pie plate. Pop the crust in the freezer for about 15 minutes.
2. Make the filling: In a food processor, puree 1 cup of raspberries with one peach. In a large bowl combine the Cool Whip and vanilla yogurt. Fold in the fruit puree and stir until it turns a uniform color.
3. Remove the crust from the freezer and pour in the filling. Level with a rubber spatula. Place the remaining fruit on top of the pie in any sot of configuration you like. Cover with plastic wrap and place the pie in the freezer for at least 4 hours.
*If the pie has been in the freezer for significantly longer than 4 hours, be sure to let it thaw for about 15 minutes before cutting. This way the crust will soften enough that it doesn’t crumble when you lift it out of the pie plate.
Apr
Almond Butter Dark Chocolate Cookies
 Rainy days are made for baking cookies… and eating cookies. Or to be exact, eating three cookies in a row plucked straight from the still hot baking tray. What…no, I would never do that! I always wait patiently for the cookies to cool before stuffing them in my mouth. Ha! Yeah right, I mean does anyone wait? Seriously, the person who can resist devouring cookies still warm from the oven is clearly a better person than me. There’s just something about the thrill of burning my fingertips on gooey melted chocolate and the roof of my mouth on piping hot dough that I simply can’t resist. Come on, what’s a few burned fingers when what you get in exchange is mouthful of amazing almond butter cookie mixed with a generous bite of dark chocolate? Clearly the reward far outweighs the sacrifice.
 These cookies did a fine job of brightening up what was otherwise a dreary rainy day. They also gave me an excuse to try out a new kind of sugar I recently discovered. It’s called Coconut Sugar and is made from the sap which drips from coconut flower blossoms! Pretty cool huh? This is a traditional sweetener that’s been used for years in southeast Asia. The process for making the sugar sounds similar to how we make maple syrup. A little cut is made in the blossom from which the sap flows out and is collected in bamboo containers. The sap is then heated over a long period of time during which the moisture evaporates until a thick paste forms. Sometimes you can find coconut sugar sold in this paste-like form, but it seems that the most common type has been cooked even further until it becomes a granulated sugar.This is the type I bought. It looks kind of like a cross between turbinado and brown sugar.
 Coconut sugar tastes pretty similar to plain white cane sugar except that is has a hint of caramel flavor reminiscent of brown sugar. I think you could successfully use it as a substitute for either white or light brown sugar. There’s several reasons why coconut sugar is all the rage these days. First, because it’s minimally processed (especially the brands labeled organic) and contains no additives or bleaching products. Second, it has trace amounts of minerals like zinc and iron. And third, it boasts a low glycemic index which is a safer alternative for those with diabetes because it doesn’t cause such a rapid spike in blood sugar. Of course, like every product that claims to be a “healthier” sweetener there are questions popping up about the true nature of this sugar and just how low the glycemic index really is. It’s my opinion that all sugars should be used sparingly regardless of what the GI number is, but what really draws me to coconut sugar is the fact that it hasn’t been processed to death or treated with bleach and other nasty things that I would rather not put in my body. For that same reason my favorite sweeteners lately have been honey and maple syrup. The problem is that it can sometimes be hard to use these liquid sweeteners in recipes that call for dry sugar. In these cases coconut sugar seems like a great alternative.
Speaking of maple syrup…I couldn’t resist including just a little. I suspected that the maple flavor would be the perfect compliment to the almond butter and the teaspoon of cinnamon that I added. Guess what? I was right.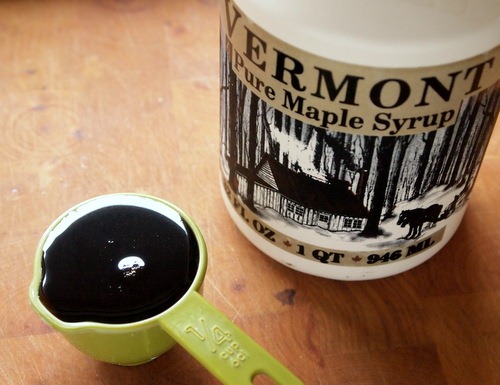
This was my first time making almond butter cookies. Well, actually my second time because the first batch, while tasty, came out with a texture more like cake than a cookie. The solution was more butter-like twice as much butter. I had this theory in my head that since I was including almond butter I could use less regular butter. Not true. Almond butter does not act the same as butter made from a dairy product, at least not in these cookies. The almond butter has a very mild flavor- in fact, I couldn’t detect any almond flavor in these cookies at all. There is a slight nutty taste that is sooo good along with the cinnamon and maple flavors. This amazing combo makes these cookies pretty irresistible in my book.  I also added lots of chocolate chips…because I could.
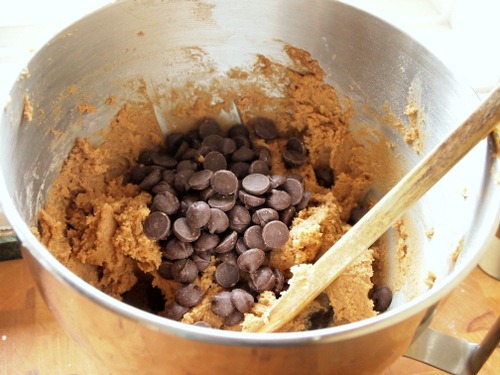
These are lumpy looking cookies that don’t spread much as you bake them. I smashed the first batch down with a fork like you would with traditional peanut butter cookies, but for this batch I decided to leave them as is in all their lumpy glory. If you want a thinner cookie go ahead and give them the fork treatment but be sure to reduce the baking time by a few minutes. Yum!
Yum!

Almond Butter Dark Chocolate Cookies
makes: 2 dozen cookies
1 1/2 cups white whole wheat flour or whole wheat pastry flour
1 teaspoon baking powder
1/4 teaspoon salt
1 teaspoon cinnamon
1/2 cup coconut sugar or light brown sugar
1/4 cup maple syrup
8 tablespoons (1 stick) unsalted butter, room temperature
1/2 cup raw almond butter
1 egg
3/4 cup dark chocolate chips
1. Preheat oven to 350ºF. Line two cookie sheets with parchment paper or silicone baking mats.
2. In a medium size bowl whisk together the flour, baking powder, salt and cinnamon.
3. In a large bowl, or in a stand mixer bowl, beat together the sugar, maple syrup and butter until fluffy with the beater on high. Add the almond butter and egg and continue mixing on medium high until completely incorporated. Add the flour mixer in two parts with the mixer on medium-low. Beat until just combined. Using a wooden spoon fold in the chocolate chips.
4. Drop heaping tablespoons of dough on the prepared baking sheets. The cookies will not spread very much so they only need a little space in between. I was able to fit 12 cookies on each 9×11-inch baking sheet.
5. Bake for 12-14 minutes, rotating the sheets once if they are on different levels of the oven. The tops will the slightly browned. Cool on wire baking racks.
Subscribe by e-mail
Recent Posts
Tags
Archives
Tasty Reads

