
Jan
Pineapple Coconut Layer Cake

I’m a hug fan of birthdays. I’m also a huge fan of cake. Which means that when it comes to birthday cake I’m practically in love. It’s my mom’s birthday this week and while I’m not sure if I’m allowed to tell you exactly how old she is, let’s just say that it’s kind of significant birthday this year. The kind of birthday that demands a really special, over-the- top cake. A cake with thick gooey pineapple curd that oozes between the layers. A cake with coconut rum both in the batter and the frosting. A cake that is topped with a mountain of fresh pineapple and scattered with toasted coconut. This is the kind of cake that a special birthday demands – a cake that says “it’s your birthday…now indulge!”
Growing up we always had homemade birthday cake. About a week before your birthday my mom would ask what kind of cake you wanted and then she would make it. There was no store bought cardboard tasting sheet cake with sickly sweet frosting, or even cake made from a box mix. It was your birthday and you got a homemade cake made from scratch. She would make whatever kind you wanted, but her most famous (and most requested) was ice cream cake. It had all the good stuff layered into one mouth watering cake- cookie crust, fudgy chocolate syrup, creamy ice cream, and a layer of frozen whipped cream to top it all off- yumm! My brother and I have both gone through the pie phase where we request pie instead of cake for our birthdays. No problem- she’ll make you pie if that’s what you want. We’re both huge fans of her lemon meringue pie, but if you want apple she’ll make you apple, if you want blueberry, or strawberry rhubarb, or pecan that’s fine because she can make those too. This year on my birthday I will turn 35 (gulp) and I can guarantee that about a week before my mom will ask what kind of cake I want. Probably when I turn 50 she’ll still be making me a cake on my birthday.
This is why I make birthday cake. Because I learned from my mom how much sweeter a birthday can be with home made cake. My cakes are never perfect. Inevitably one layer is bigger than the other, they may lean a bit to one side and the frosting is always lumpy and uneven. It doesn’t matter though because homemade cakes are not about perfection. They’re not about smooth even sides or fancy swirled frosting. They are about celebration and joy and family gatherings. So I made this cake for my mom because that’s what she taught me to do. Here’s to you mom and I wish you a very, very happy birthday ♥
Pineapple Coconut Layer Cake
slightly adapted from Eating Well
Makes 16 servings
1 1/2 cups whole wheat pastry flour
1 cup white whole wheat flour
2 teaspoons baking powder
1/4 teaspoon salt
1/3 cup canola oil
3 tablespoons unsalted butter, melted
3/4 cup turbinado sugar
1/2 cup brown rice syrup
3/4 cup milk
2 tablespoons coconut rum
2 teaspoons coconut extract
3 egg whites
6 ounces pineapple juice
2 egg yolks
1/4 cup turbinado sugar
5 teaspoons cornstarch
12 ounces 1/3 less fat cream cheese, room temperature
1/3 cup powdered sugar, sifted
1 tablespoon coconut rum
1 teaspoon coconut extract
2 tablespoons toasted coconut*
1 1/2 cup pineapple, diced small
1. Preheat the oven to 350ºF. Line the bottom of two 9-inch cake pans with parchment paper and spray with cooking spray.
2. In a medium bowl sift together the flours, baking powder and salt. Set aside.In a large bowl combine the sugar, brown rice syrup, oil and butter. Beat on medium high for 3-4 minutes. In a small bowl whisk together the milk, coconut rum and coconut extract.
4. With the mixer on low, add the flour and milk mixture in four alternating additions, starting and ending with the flour. Scrape the sides of the bowl as needed.
5. Using a clean dry bowl and beaters, beat the egg whites on high until soft peaks form. Gently fold the egg whites into the batter. Divide the batter between the two pans and smooth out towards the edges.
6. Bake for 25-30 minutes or until a wooden pick inserted comes out clean. Cool in the pans on a wire rack for 10 minutes. Remove from the pans and cool completely for about an hour before assembling and frosting.
7. Make the pineapple curd: In a small saucepan heat the egg yolks, pineapple juice, 1/4 cup turbinado sugar and cornstarch over medium-low heat. Cook for 3-5 minutes, whisking constantly until the thick. Remove from heat and let cool.
8. Make the frosting: In a medium bowl beat together the cream cheese, powdered sugar, coconut rum and coconut extract until fluffy.
9: Assemble the cake: Place one layer of the cake top side down on a plate or cake stand. Spread the pineapple curd evenly over the top leaving a 1/2-inch border around the edge. Sprinkle 1/2 cup of the fresh pineapple over the top of the curd. Place the second cake layer top side up on the curd- pineapple layer. Coat the top and sides of the cake with frosting. Pile the remaining 1 cup of fresh pineapple on the top of the cake and sprinkle with toasted coconut.
* Toast the coconut in a dry skillet over medium heat for 3-5 minutes or until it begins to turn brown.
Jan
Key Lime Cupcakes

I decided to be rebellious this week. I made cupcakes…in January. Not just cupcakes in January, but cupcakes at the beginning of January- a mere 10 days from then date when most of us made resolutions to be healthy and eat more veggies. Why you ask? Why is she posting this delicious looking cupcake recipe when all I’ve had to eat for the last week is salad? The answer- because I am a firm believer that we all need a little sweet in our lives now and then…even on the 10th of January. Oh, and I also really like cupcakes. 
I tried to be nice about it though. This recipe has been given a complete health make over, and while not comparable to say a handful of carrot sticks or a bowl of kale soup, it’s far better for you than a twinkie or a bag of cheese puffs. Okay…so those were weird comparisons. What I am trying to say is that eating one of these cupcakes will not undo all the good you’ve done in the last 10 days of salad eating. 

Here’s what I did so these cupcakes could pass the January health test. First, I replaced all the white flour with whole wheat pastry flour. Have you ever used this stuff? It’s amazing. All the benefits of whole wheat with out the heavy, chewy texture. I also cut the sugar from 1 1/2 cups to 2/3 of a cup. It seems like a large amount to cut out and I was a bit skeptical, especially since the recipe includes both lime juice and lime zest. I was pleasantly surprised though. When I first bit into one I was greeted by a mild sweetness that was balanced perfectly by a tangy burst of lime. Now that’s my kind of healthy! The final modification in this cupcake makeover was to replace one egg with ground flax meal. 
I am a HUGE fan of ground flax meal. I love to sprinkle it on and in everything. It’s a really easy way to get in those omega 3 that everyone is always talking about, and it has a mild enough flavor that you can add it to most anything without even noticing. Normally I just add a couple tablespoons to whatever I am making but with something light and delicate like cupcakes I was afraid it might mess with the balance and make them too dry. So when I came across this bit of advice for using it as an egg substitute I knew I had the answer. It’s really simple. For each egg you are replacing mix one tablespoon ground flax seed with 3 tablespoons of water. I only replaced one of the eggs that the recipe called for but it worked so well that next time I will try replacing both. There you have it- a healthier cupcake that you can eat even in January. 
But wait! I almost forgot about the frosting. What can you do to make cream cheese frosting more healthy? Hmmm…ditch it for something that isn’t comprised solely of cream cheese, butter and sugar. Yeah, that’s probably the right answer but I couldn’t bear to give it up. So what did I do? I cut the amount in half. Half the amount of frosting for the same amount of cupcakes. A perfect solution if you ask me. It was still enough frosting to give each cupcake a nice coating but not so much that it was piled up and spilling over the edges.
My final bit of advice for making guilt-free cupcakes- share them. I love to share my baked goods not only because it makes people happy when you show up at their house with cookies and cupcakes, but because it also means less for me to eat! 
Key Lime Cupcakes
Inspired by Bon Appetite
Makes: 12
1 3/4 cup whole wheat pastry flour
1/2 teaspoon baking powder
1/2 teaspoon baking soda
1/4 teaspoon salt
2/3 cup white sugar
1/2 cup (1 stick) unsalted butter, room temperature
1 egg
1 tablespoon ground flax seed
3 tablespoons water
2 1/2 tablespoons key lime juice (from about 5 key limes)
1 tablespoon key lime zest
3/4 cup buttermilk
4 ounces 1/3-less fat cream cheese, room temperature
4 tablespoons unsalted butter, room temperature
3/4 cup powdered sugar
1 tablespoon key lime juice
1 teaspoon key lime zest
1. Preheat the oven to 350ºF. Line a 12-cup muffin tin with paper liners.
2. In a medium bowl, whisk together the flour, baking powder, baking soda and salt. Set aside. In a small bowl mix the ground flax seed with 3 tablespoons of water. Set aside.
3. In a large bowl fitted with an electric mixer, or using a hand held mixer, beat the butter and sugar on high until fluffy. Add the egg and the ground flax seed mixture, beating well between each addition.Scrape down the sides of the bowl and beat in the key lime juice and zest. Turn the mixer to low and add the buttermilk and flour mixture in two additions, beginning and ending with the flour. Mix until just combined.
4. Pour the batter into the prepared baking cups. Bake for 20-35 minutes or until a wooden tester inserted comes out clean. Let cool on a wire rack before frosting.
5. Make the frosting: If your butter and cream cheese are soft enough you can easily make the frosting with just a wire whisk- make sure you sift the powdered sugar though to avoid lumps. Of course, using an electric beater is fine too. Whisk or beat the cream cheese and butter until well combined. Sift the powdered sugar over the butter and cheese mixture and add the lime juice and zest. Whisk or beat well to combine.
6. Spread the frosting evenly over each cupcake. Top with a lime slice for garnish if desired.
Dec
Chocolate-Peppermint Swirl Cookies

Cookie time! I wouldn’t normally make cookies two weeks in a row, but it is the holidays after all. Also, after last week’s cooking mishaps I had to redeem myself somehow. It’s true that I had my heart set on making those pesky candied grapefruit peels for holiday gifts, but since the result was nothing short of disastrous I decided to go back to something I know I can make- cookies!
Let me tell you, this recipe did not disappoint. I mean really how could it? Anything that combines melted chocolate with crushed candy canes is bound to be amazing. Chocolate and peppermint is not only a super delicious combination of sweet and sweeter, but something about it just screams holiday time- perfect for cookies that I want to give as gifts. I’ve made other variations of these swirl cookies in the past and I have to say that this one wins the prize. The recipe that inspired this cookie is Martha Stewart’s Chewy Coconut-Chocolate Pinwheels. These cookies were part of my holiday baking line-up for many years and while they are pretty tasty, next to this new version they’re down right boring! The addition of crushed candy canes in the sugar cookie dough creates a cookie that manages to pull off both a chewy and crunchy texture at the same time. Combine this with a thick gooey layer of melted chocolate and you have a winner.
Despite their impressive appearance, these cookies are actually quite simple to make. The hands on baking time is pretty short, but you do need to chill the dough twice so don’t try and make these an hour before you want to bring them to a party. I’ve even made you a handy step-by-step photo guide (my first ever) to walk you through the process- happy baking!
Start by crushing the candy canes…I used a hammer wrapped in plastic
Make the dough – I love the colorful bits of cane mixed in there
Roll out the dough and trim the edges to form a rectangle
While the dough is chilling melt some chocolate…try not to eat it out of the bowl!
Spread the chocolate on the chilled dough
Rolllll it up….
Wrap the cookie log and chill again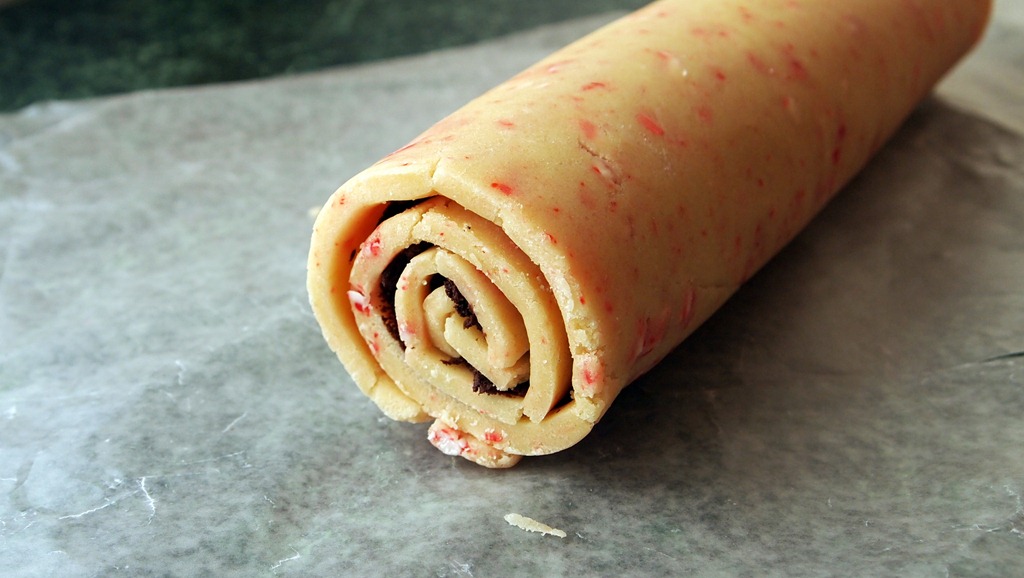
Slice and bake
Fresh out of the oven
Peppermint-Chocolate Swirl Cookies
Inspired by Martha Stewart’s Chewy Coconut-Chocolate Pinwheels
Makes 2 dozen cookies
1/2 cup candy canes. crushed
2 cups unbleached all-purpose flour
1/2 teaspoon baking soda
1/4 teaspoon salt
9 tablespoons unsalted butter, room temperature
1 cup granulated sugar
1 egg
1 1/2 teaspoons peppermint extract
6 ounces bittersweet chocolate
1/2 cup sweetened condensed milk
1. In a medium bowl whisk together flour, baking soda and salt. Set aside. In a large bowl fitted with an electric mixer, or using a hand beater, cream 8 tablespoons of butter and the sugar until fluffy. Add the egg and peppermint extract; mix until combined. With the beater on low, add the flour in two additions. Fold in the crushed candy canes and mix until just combined.
2. Roll the dough out between two pieces of parchment paper until it resembles an approximately 10 x 15- inch rectangle. Trim the edges to make a neat rectangle. Place the dough on a baking sheet and refrigerate for 1 hour.
3. About 10 minutes before you take the dough out of the fridge, melt the chocolate. In a heat proof bowl set over a simmering pot of water melt the remaining 1 tablespoon of butter with the chocolate; stirring occasionally for about 3-4 minutes. Remove from heat and stir in the sweetened condensed milk. Set aside to cool slightly.
4. Remove the dough from the refrigerator and peel off the top layer of parchment. Spread the chocolate evenly over the dough rectangle. Using the bottom piece of parchment roll the dough starting at the short end. Wrap the dough and chocolate log tightly in plastic wrap and return to the refrigerator for another hour.
5. Preheat the oven to 350º. Have ready two baking sheets lined with parchment paper or silicone baking mats.
6. Remove the cookie log from the refrigerator and cut into 1/4-inch thick slices. Bake for 10-12 minutes rotating the sheets once halfway through the baking time. The edges of the cookies will be lightly browned. Transfer to a wire baking rack to cool.
Subscribe by e-mail
Recent Posts
Tags
Archives
Tasty Reads

